
What we’ll be doing: Making the simplest building you can possibly make and turning it into a reusable piece of terrain for Tabletop Simulator. This is aimed at complete beginners, since I quite literally taught myself how to do this a few days before writing this up. The methods I use are what worked for me, but as with most things, there are probably other ways to get the same outcome.
Step 0: Things You Will Need To Start
Tabletop Simulator
This should be fairly obvious.
A Web Browser
You are using one right now!
Blender
For this series of tutorials I will be using Blender for all 3d modelling. It is free, and there is a big community of people who make lots of great tutorials on using it. I highly recommend watching a few to get used to the basics, as I won’t go into too many details here, largely because I have no idea what I’m doing. A channel I recommend is Artisans of Vaul: their Blender setting guide is how I got started.
An Image Editor
You’ll need to make your own textures, either from scratch or putting together bits and pieces you find. Remember not to use copyrighted stuff.
I use Affinity Photo, but it honestly doesn’t matter; as long as you can save .png files, it’s all good.
Step 1: Figuring out your scale
The first thing you’ll need to do is determine how big you need to make things
inside Blender. The best way to do this is to import the Range 2 tool, and
use that as a guide. At least I think that’s what you should do. It is possible
that you can just assume that the Range 2 tool is 3 Units big, but to be safe, I made sure!
Open up Tabletop Simulator (TTS from now on), and load the Shatterpoint mod. Drag out the Range 2 tool, and right-click on it. From the little menu that pops up, pick Custom. The first field in the dialog that pops up–Model/ Mesh–contains the URL of the 3d model for the tool. Double-click into the field to select all the text and copy it.
Paste that URL into your web browser, and it should download a file with the .obj
extension. This is a Wavefront Object file. This is one of the formats TTS
understands, and is the one we’ll be using throughout the tutorial.
You can close TTS, and open up Blender. Delete anything in your scene / file, and then pick File -> Import -> Wavefront. Select the file you just downloaded, and you should see an object show up. In the Item tab on the right side of the view window (hit n on your keyboard if you can’t see it) to see how big the object is. The dimension you care about will be the largest one, representing the length of the tool. This is likely 3.0 but maybe not!
Your terrain should be taller than this dimension, so add a bit to that, and use that as the consistent height for your terrain. For me, I decided that 3.5 was good (also because Shatterpoint terrain is 3.5 inches tall.) Units do not seem to matter. If your settings are for mm, m, feet, or inches, it seems to be all the same, as long as you keep it relative to the Range 2 tool.
This is the most complicated part, so if you managed that, the rest will be a breeze.
Step 2: Make a Box
Still in Blender, you can delete the Range 2 tool object and Make a cube (Shift-A -> Mesh -> Box), use the Item tab to size it to the dimensions you want your building to be. You can do this by typing in the sizes in the Dimensions section of the Transform panel on the side. For reference, the first one I made was 3.5 wide, 5 long, and 3.5 tall.
When you size things in the Item panel, it does so in a way that can cause issues later, so we need to tell Blender “We don’t have a 1x1x1 cube that has been scaled, we have a 3x5x3.5 box”. We do that by selecting our box and going to the Object menu and choosing Apply -> Scale (learn the keyboard shortcut for this one!)
Congratulations, your first building is modelled! Now to make it look like a building.
Step 3: Texture the Box
Select your box, and pick Edit Mode from the top left of the toolbar just above your view. This mode lets us select the faces, edges, and vertices that make up our box. In the top-most menu, pick the UV Editing workspace, and your screen should split in two. On the right is your model, an on the left are all the faces of your box.
You will notice that these faces all are square, which our box is not! This is because we started with a default cube in step 2, and so the texture map still thinks they are square. If you are okay with this, you can just use the squares as a base for your textures, but that messes with my brain, so I do what’s called “UV Unwrapping” to get the faces all the right size. I have no idea what “UV” stands for, but it doesn’t matter!
In the Right Side UV menu (there is one on both sides, and they have different
options, so if you don’t 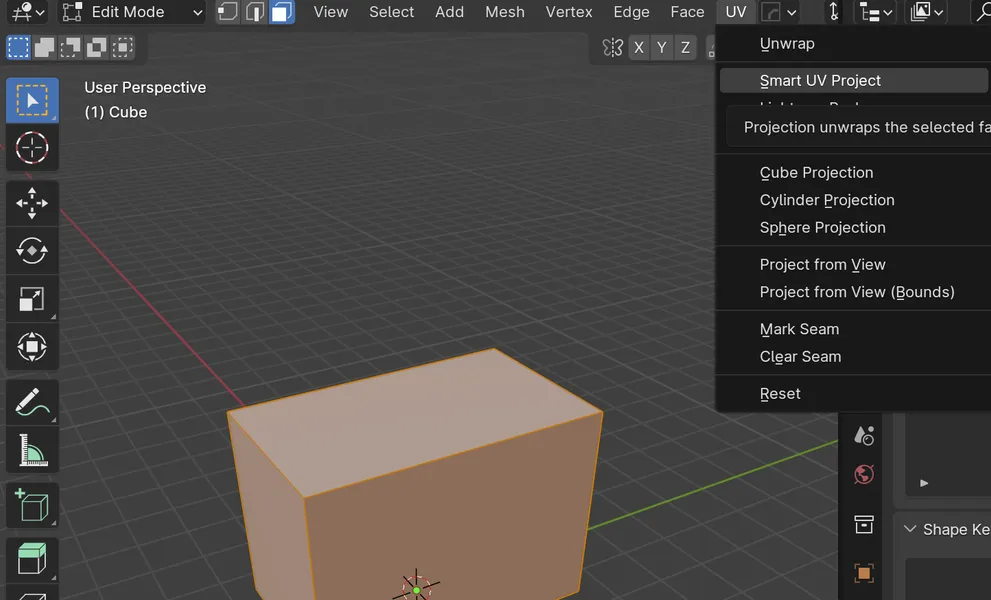
We will use these lines to create our custom textures, so make sure you can see all
the lines still on the Left Side (Click in the Right Side, select all with the A
key) and then on the Left Side, pick UV -> Export UV Layout. Save it as
BuildingUnwrapped so we know that this is the UV projection of our building.
To help us know which way the sides are facing, we’re going to use a helper texture
that Blender will make for us. On the Left Side menus, pick Image -> New and in
the little dialog that shows up, under Generated Type pick Color Grid. Then
use the Image menu again to do Image -> Save and save it to the directory with
your building. Name it something like HelperTexture so you don’t mix it up later.
Now we will apply this texture to our building. To do that, we have to create a new
Material. Make sure your building is still selected before proceeding! On the strip
of icons running down the right side, click the red globe looking one to open the 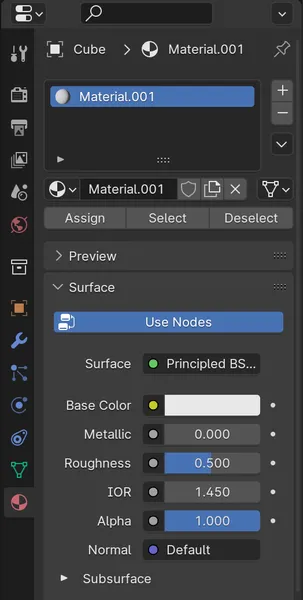
HelperTexture image.
You may be wondering why the building didn’t get the texture applied to it. Trust me,
it did! By default, Blender does not render things with textures to make things faster.
To show the textured view, in the Right Side top menu, you need to click the dropdown
on the far right side 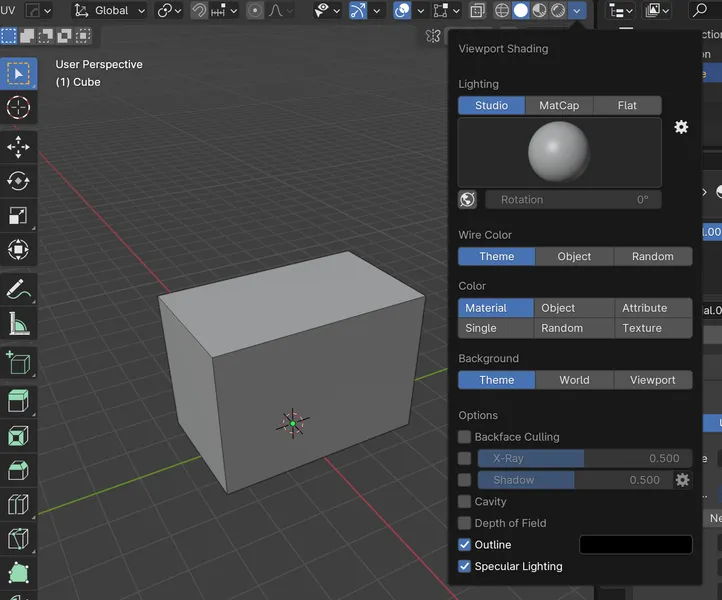
In your image editor of choice, open the BuildingUnwrapped PNG file. If you want,
you can also put the HelperTexture under it on another layer. Make some fancy
building-looking textures however you want. I find a nice way to start is my making a
solid color then adding a lot of noise to it as a base.
Once you are happy, export your file as a PNG (making sure to turn off the unwrap and
helper layers), named something clever like BuildingTexture. If you want to make sure
things look right, you can go back to Blender and in the Material Editor you can
change the image of the material on the box by hitting Open again and picking the
PNG you just made. Note that applying the texture in Blender is not at all needed, as
TTS will not care at all if there is one or not.
Okay, maybe I lied about Step 1 being the hardest bit.
Step 4: Get your Box into Tabletop Simulator
Now we have a model in Blender and a texture we know looks good; let us get it into TTS!
We need to export the Blender model to a file type TTS will understand, which as you
recall is a Wavefront Object. In Blender, go back to the Modeling workspace
(click on it in the very top bar), make sure you are in Object Mode, and make sure
your building is selected. Pick File -> Export -> Wavefront (.obj) and a dialog
will show up. Apparently Blender and TTS do not agree on which way is up, so we need
to change some of the export settings from their defaults or your stuff won’t show up
correctly. We need to make sure the Forward Axis is set to Z (not -Z, which is
Blender’s default) and we want to make sure we have Triangulated Mesh is checked.
Basically, make it look like 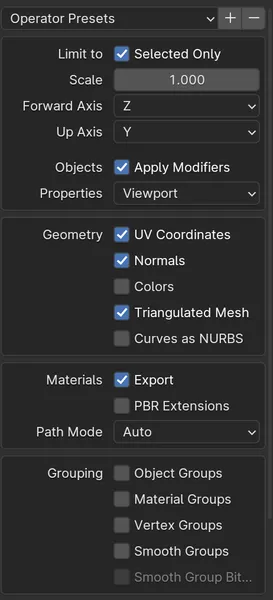
.obj file to your project directory with a clever name
like MyBuilding or something.
The astute observer will notice that Blender exported two files: the .obj file we asked
for and another .mtl file. I don’t know what that is, but we don’t need it, so you can
trash it or ignore it.
Time to head back into TTS. Open it up, and create a new Singleplayer game. You don’t need to load any mods or anything, so just close the games dialog that shows up. From the top menu, pick Objects and then Components -> Custom and drag out a Model sphere onto the table. The Custom Model dialog will pop up automatically.
Load our model into TTS by clicking the folder icon to the right of Model/ Mesh and
selecting the MyBuilding.obj file we saved in the last step. It will ask you if you
want to save it to your Steam Cloud or just use the local file. If your building is so
good you want to share it with the world, pick cloud. Then load the texture we made
by clicking the folder icon to the right of Diffuse/ Image. Almost done! By default,
TTS will apply a shiny effect to custom models, which tends to look bad on terrain.
To fix that, click the Material tab and pick Cardboard in the Material spot.
Click Import and if all went well, your building is inside Tabletop Simulator!
Step 5: Save your Box in TTS
To be able to add your building to maps later, you now need to save it inside TTS. Right-click on your building and select Save Object. Give it a name you will remember, and from now on you’ll be able to get a copy of it by picking Objects -> Saved Objects whenever you want.
Congrats! You have made custom terrain for Shatterpoint TTS. You are pretty awesome. Part 2 will cover making buildings that are non-rectangular, which require some fancy steps to make sure they interact well with models. But to be honest, with good texturing, you can make some great stuff with just boxes. I hope this was helpful, and I’ll see you next time!