
Regardless if you made your own terrain pieces or not, if you want to put together a map in Tabletop Simulator, there’s a few handy things to know.
Setup
Since I assume we are making a Shatterpoint map, load up the Shatterpoint TTS mod to begin. From here, you can either load an existing map and modify it, delete all the terrain from it to use the floor as a starting point, or not load any map at all and do everything from scratch. If do that, you’ll need to make the playing surface yourself. Those of you modifying an existing map can skip down to the next section.
To make a custom ground, you will have to have an image ready, or it won’t let you create one. If you have one you want to use on your computer, neat! If not, I have created a template image that has all the locations for the objectives in both mission packs that I find very helpful to start with. You can just paste in this URL for your texture if you want to use it:
http://cloud-3.steamusercontent.com/ugc/2379658474890195055/BD39CE3E4FA1E622B8D0B79211A5EDFD71957565/No matter what texture you want to use, go to Objects -> Components -> Custom and drag out a Tile. A dialog will pop up, and you want to make sure it is set to Box (which is the default) and that the Thickness is set as low as it can go. That should be the only thing you need to change, other that setting a Top Image. If you don’t set that, it won’t actually put it on the table.
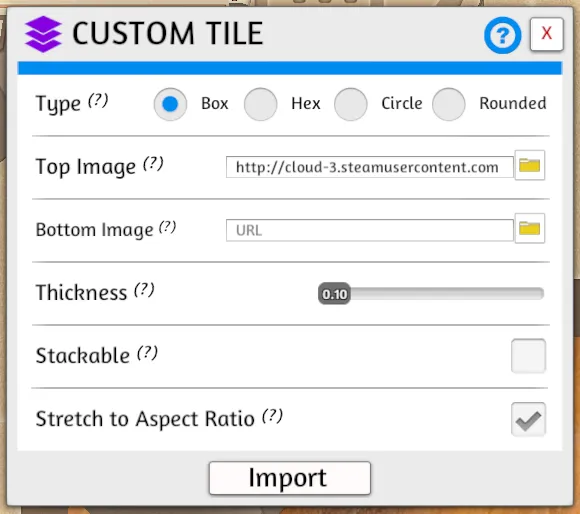
Make your Tile look like this.
You will notice your tile is a bit on the small side. To fix that, we will use the Gizmo tool. It is the third up from the bottom, so click on that and then click on your tile. A Transform box will appear, and you need to enter an X and Z position of 0.0, a Y position of 0.96, an X and Z scale of 18.0, and a Y scale of 1.0. Now your ground is in the right spot and is the right size. We will be using the Gizmo tool a bunch later, so remember where it is!
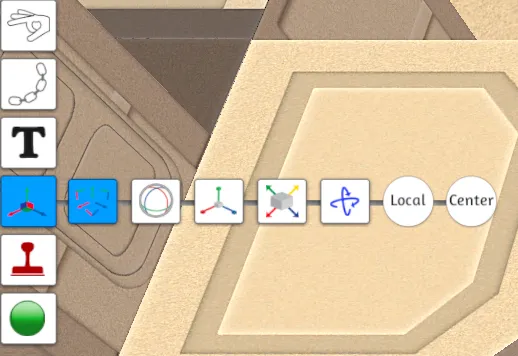
The Gizmo tool

Correct Transforms for your ground.
Getting Objects Onto The Table
You probably already know how to do this, but in TTS, click on Objects -> Saved Objects and then drag whatever it is you want out onto the map.
Object Settings
One thing I have found vey helpful is that the instant I drag something onto the map, I right click on it, go to the Toggles section, and make sure Grid is not checked, and that Locked is. This allows you to move the object wherever you want without it shifting over to match the grid, and it also allows it to intersect with other (locked) objects without physics causing them to fly all over the place.
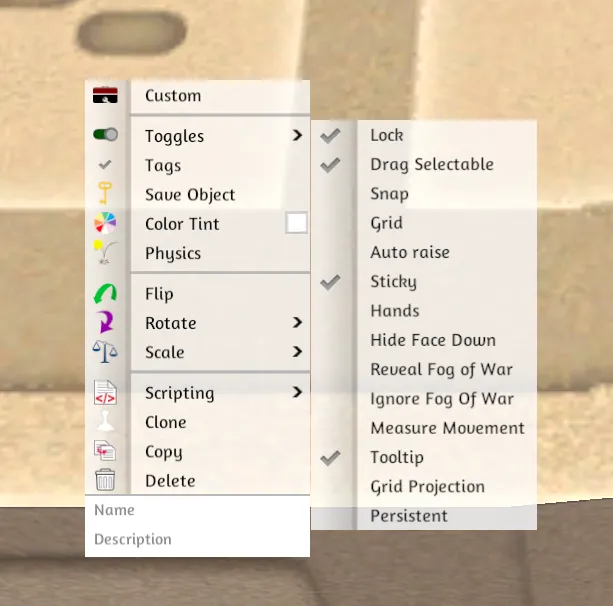
Some good object toggles
Moving and Rotating
But wait! If my object is locked, how on earth will I move it around!? I am glad you asked. Instead of the little hand tool we are accustomed to moving things around with in game, I find it much better to use our friend the Gizmo tool instead. When you click on an objet with the Gizmo tool, a dialog will appear nearby that lets you set the position, rotation, and scale of that object. You can either type numbers in, or, you can click and drag on the letters next to the inputs to increase or decrease the values. For those of you who skipped down here, there’s a picture of the Gizmo tool up above if you need it
While typing in values for rotation is super handy, using the dialog for moving objects is not all that great. The good news is, the Gizmo tool gives you a second way to move things: you will see a set of arrows appear in the center of the selected object. If you hover over the ends of any of them, it will turn yellow. When it is yellow, clicking and dragging will move the object along that axis.

Use these to drag stuff
What I like to do is select an object with the Gizmo tool, type in the rotation value I want (in TTS you usually want to rotate on the Y axis) and move it using the little arrows to roughly where I want. Then if I know the object has a nice size (like the terrain I make) I then fine-tune the position to an exact value in the dialog.
Linking Objects
If you make a larger structure from other pieces (like stacking a platform on top of a building) and you want to move or rotate that as one thing, you can do that with the Link tool. Pick the link tool, click on one of your objects and drag over to the other one. You can repeat this as needed to link multiple objects together.
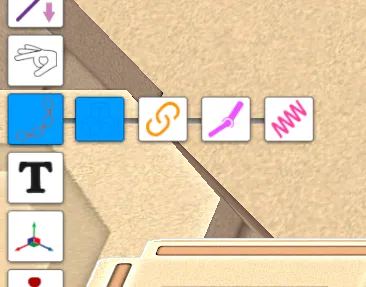
The Link tool
Linking two objects
Should you later on not want something to be linked, you use the Link tool again, but this time you drag on to nothing, and that removes the link.
Saving Your Map
While working on your map, you can use the normal Save Game functionality to save and load as you go.
When you are all done, and are ready for play testing, click on the little Save Table button in the mod, and you’ll get a little bag. It will have a name like 34 Set_ that is based on the number of objects in it. It is essential that you do not rename this bag! Now that your map is in a little bag, you may think it is all good, but you are not done yet! For some reason I do not understand, you must double bag your map.
Click on Objects -> Components -> Tools and drag a Bag out. Right click on it, and down at the bottom, you can name your bag with the name of your map. Then, click and hold on the first bag (the one named “Something Set”) to make sure you are moving it, and not pulling things out of it, and drop it on the bag you dragged out. Now you can right click and Save Object and your map is now usable with the mod!
Sharing
If you want other people to be able to play your map, head to your Tabletop Simulator library (on a Mac it is at ~/Library/Tabletop\ Simulator) and in the Saves -> Saved Objects folder, you will find a .json file named whatever it was you saved your map as. You can give this file to people, and they will be able to load it into TTS by putting it in their saved objects.
That concludes the series! I hope it was useful, and happy map making.